Quantcast
Channel: MSDN Blogs
Viewing all 5308 articles
Browse latest View live

PowerShell script to restart role instances for WebApp

$
0
0

The Azure PowerShell cmdlets for WebApp allow you to restart a WebApp or a WebApp slot. They do not however allow to restart an instance within the WebApp - or to be precise, the w3wp.exe process within that instance as it is the one that runs the WebApp instance. This is however a convenient feature to have which the "Diagnose and Solve problems" blade of App Service in the Azure management portal allow you to do (so-call Advanced Application restart - see step 3 of https://blogs.msdn.microsoft.com/appserviceteam/2016/05/18/web-app-troubleshooting-blade/). Sometimes you do no have access to the portal or you do want to automate this work and then a PowerShell script comes handy.

This is a very slight revision over Brando Zhang's StackOverflow answer at https://stackoverflow.com/questions/43810248/powershell-for-an-advanced-application-restart-on-an-azure-web-app

The improvements are to take the parameters as formal inputs to the script. Also the resource group name is extracted from Get-AzureRmWebApp. Finally I introduced a 5 minutes pause between each instance restart. This because I used this script today to force a load-balancing in our own service hence didn't want all instances to be down at the same time.

I've hacked the login and connect quickly so you will get two prompts. Likely this can be refined to keep only one.

You can copy-paste this script into a text file named RestartWebAppInstances.ps1

Param(
  [Parameter(Mandatory=$True)][string]$subscriptionId,
  [Parameter(Mandatory=$True)][string]$webAppName
)

Login-AzureRmAccount
Connect-AzureRmAccount
Select-AzureRmSubscription -SubscriptionId $subscriptionId
Set-AzureRmContext -SubscriptionId $subscriptionId

$webApp = Get-AzureRmWebApp -Name $webAppName
$rgGroup = $webApp.ResourceGroup

$webSiteInstances = @()

#This gives you list of instances
$webSiteInstances = Get-AzureRmResource -ResourceGroupName $rgGroup -ResourceType Microsoft.Web/sites/instances -ResourceName $webAppName -ApiVersion 2015-11-01 

$sub = (Get-AzureRmContext).Subscription.SubscriptionId 

foreach ($instance in $webSiteInstances)
{
    $instanceId = $instance.Name
    "Going to enumerate all processes on {0} instance" -f $instanceId 

    # This gives you list of processes running
    # on a particular instance
    $processList =  Get-AzureRmResource `
                    -ResourceId /subscriptions/$sub/resourceGroups/$rgGroup/providers/Microsoft.Web/sites/$webAppName/instances/$instanceId/processes `
                    -ApiVersion 2015-08-01 

    foreach ($process in $processList)
    {               
        if ($process.Properties.Name -eq "w3wp")
        {            
            $resourceId = "/subscriptions/$sub/resourceGroups/$rgGroup/providers/Microsoft.Web/sites/$webAppName/instances/$instanceId/processes/" + $process.Properties.Id            
            $processInfoJson = Get-AzureRmResource -ResourceId  $resourceId  -ApiVersion 2015-08-01

            # is_scm_site is a property which is set
            # on the worker process for the KUDU 

            $computerName = $processInfoJson.Properties.Environment_variables.COMPUTERNAME

            if ($processInfoJson.Properties.is_scm_site -ne $true)
            {
                $computerName = $processInfoJson.Properties.Environment_variables.COMPUTERNAME
                "Instance ID" + $instanceId  + "is for " +   $computerName

                "Going to stop this process " + $processInfoJson.Name + " with PID " + $processInfoJson.Properties.Id

                # Remove-AzureRMResource finally STOPS the worker process
                $result = Remove-AzureRmResource -ResourceId $resourceId -ApiVersion 2015-08-01 -Force 

                if ($result -eq $true)
                { 
                    "Process {0} stopped " -f $processInfoJson.Properties.Id
                }

                "Sleep for 5 minutes"
                Start-Sleep -s 300
            }
       }
    }
}

ODBC Driver 17.2 for SQL Server Released

$
0
0

We are pleased to announce an update to the Microsoft ODBC Driver 17 for SQL Server!  Version 17.2 brings a few added features and several fixed issues.

Added

  • Support for Data Discovery and Classification information on Azure SQL Database and SQL Server
  • Support for UTF-8 server encoding
  • Support for Ubuntu 18.04
  • Idle Connection Resiliency support has been extended to Linux and macOS
    • The ConnectRetryCount and ConnectRetryInterval keywords can be specified in the connection string
      • Use SQL_COPT_SS_CONNECT_RETRY_COUNT(read only) to retrieve the number of connection retry attempts
      • Use SQL_COPT_SS_CONNECT_RETRY_INTERVAL(read only) to retrieve the length of the connection retry interval
      • Connections will be retried once by default
  • SQLBrowseConnect is now supported on Linux and macOS
  • On Linux and macOS, dynamic dependency on libcurl:
    • Starting with version 17.2, the libcurl package is not an explicit package dependency. The libcurl package for OpenSSL or NSS is required when using Azure Key Vault or Azure Active Directory authentication. If you encounter an error regarding libcurl, ensure it is installed.

Fixed

This release also contains the following fixed issues:

  • Fixed an error message about Azure Active Directory Authentication
  • Fixed encoding detection when locale environment variables are set differently
  • Fixed a crash upon disconnect when connection recovery is in progress
  • Fixed detection of connection liveness
  • Fixed incorrect detection of closed sockets
  • Fixed an infinite wait when attempting to release a statement handle during a failed recovery
  • Fixed incorrect uninstallation behavior when both version 13 and 17 are installed on Windows
  • Fixed incorrect decryption behavior on older Windows platforms (Windows 7, 8 and Server 2012)
  • Fixed a cache issue when using ADAL Authentication on Windows
  • Fixed an issue which was locking and overwriting trace logs on Windows

Next steps

For Windows installations, you can download version 17.2 of the Microsoft ODBC Driver 17 for SQL Server here.

Linux and macOS packages are also available. For installation details see the online instructions.

Roadmap

We are committed to improving quality and bringing more feature support for connecting to SQL ServerAzure SQL Database, Azure SQL DW, and Azure SQL Managed Instance through regular driver releases. We invite you to explore the latest the Microsoft Data Platform has to offer via a trial of Microsoft Azure SQL Database or by evaluating Microsoft SQL Server.

David Engel

Making Ruuh, our AI-powered desi chatbot, see and respond to photos like humans

$
0
0

Co-authored by Sonam Damani

Work done in collaboration with Microsoft Research Redmond


A picture is worth a thousand words, at least to human beings. Machines often struggle to interpret and respond to images the way humans do.

In recent years, Artificial Intelligence (AI)-powered algorithms have combined image recognition with Natural Language Processing (NLP) to caption images presented to them by users. However, these are basic responses with literal descriptions of images and lack the depth or empathy found in human conversations.

With the growing adoption of AI agents and the ubiquitous use of images in communication, it is now essential for machines to interpret and respond to images naturally. To bridge this gap in communication, our team developed a new model for generating natural, human-like comments to images. Integrated with our desi Artificial Intelligence (AI)-based chatbot Ruuh, the model helps her respond to images like a human and hold a free-flowing conversation.

Essentially, this technology can help unlock the potential of AI-enabled assistive tools and facilitate increased user engagement by adding an emotional dimension to image comments. Images across the internet can be made more accessible by providing an emotion-aware description for alternative text (ALT text). Developers can leverage this new technology to create video games that provide players with witty observations on their gameplay, kiosks that provide users comments on their images and artificially-generated cricket commentary. Incorporating image commenting with emotional depth in AI-led interactions could thus add a whole new dimension to user experiences.

 The challenge of emotion-aware image commenting

Caption generation is a core element of the AI image(video)-to-text domain. Much of the research in this field has focused on enabling machines to detect and characterize objects in images. Existing deep learning-based image captioning methods extract visual features and recognizable objects from an image and use a language model to create basic sentences or captions for the image. Applying a Recurrent Neural Network (RNN) to these existing models can enable a machine to interpret a series of images and generate a story from them.

However, the existing models do not go any deeper. They describe the objects in the image, any numbers or text, and even recognize human faces or animals. They cannot create a sentence that evokes emotions or differentiate between positive or negative experiences captured by the image.

There have been some attempts towards this direction in the past, like StyleNet (stylized captions), SentiCap (captions with sentiments), VQG (Visual Question Generation), etc. In this work, we extended these models to be able to generate human-like questions or comments based on the style and emotion detected.

The Image Commenting model is a benchmark for human-like comments on images. The comments go beyond descriptive machine-generated responses to express opinions, sentiments and emotions. The objective is to capture the user’s attention and drive engagement in a machine-generated conversation.

How the Image Commenting model works

The datasets for most studies of this nature involve human annotators who apply captions to images. However, such a controlled data generation environment was unsuitable for our model. To collect natural responses to images we extracted more than one million anonymized image-comment pairs from the internet. These pairs were filtered for sensitive material, political statements and adult content. The data was further processed to standardize the content - remove capitalizations, abbreviations and special characters to arrive at the final dataset.

Comparing Image Commenting data to the traditional Microsoft COCO data was a crucial step in ensuring the data was as natural as possible. Our analysis revealed that Image Commenting data was more sentimental and emotional, while the COCO data was more factual. The top word in the Image Commenting dataset was “like” whereas the top word in the COCO set was “sitting”. In fact, many of the most frequently used words in the Image Commenting data were sentimental, such as “love”, “great” and “pretty”. The variation in the length of sentences was more in the Image Commenting dataset, implying that these sentences were less structured and more natural. The conclusion was that Image Commenting data was far more expressive and emotional than COCO.

Figure 1. (a) Word cloud of the top words in the COCO dataset, (b) Word cloud of top words in the Image Commenting dataset.

Architecture: The first component is image featurization, where we use ResNet for creating vector representation of images. We use this feature representation along with information from Microsoft Vision API for face recognition, celebrity recognition etc. to extract candidate set of comments from the image-comment index. In the last stage, we used Deep Structured Semantic Model (DSSM) model trained on our dataset for ranking the candidate comments.

Figure 2. Architecture of the Image Commenting model


Examples:


Figure 3. Examples of Image Commenting


Building emotional experiences and engagement with Image Commenting

With Image Commenting, machines can generate comments on images that are not just factual, but also emotive and socially relevant. The key aspect of Image Commenting is that the social language captured in the dataset is critical for making machines converse in a human-like manner.

Integrating the Image Commenting model with commercial conversational systems can enable more engaging applications. Be it visual dialog systems, visual question-answering systems, social chatbots, intelligent personal assistants and other AI-powered assistive tools, it can expand the possibilities of machine engagement with humans.

The ability to respond with an emotional and sentimental understanding and use images to convey meaning, instructions or provide reasoning can enhance the quality of conversations humans have with machines. It can add a new dimension of emotion-driven visual communication to the human-machine relationship and make the experience of using AI more engaging for users.

Demand Forecasting: Performance influencers

$
0
0

In this blog post we will explain the key performance influences for the Demand Forecasting feature for Microsoft Dynamics 365 for Finance & Operations, which are under the user's control.

It is important to read and understand this blog if you are implementing Demand Forecasting for Microsoft Dynamics 365 for Finance & Operations.

Number of enabled forecasting dimensions

The Forecasting dimensions are accessible via Demand forecasting parameters form under the Master planning menu, as illustrated below:

Enable only the must have forecasting dimensions. If you experience a timeout in the Azure Machine Learning when generating the statistical baseline forecast, one of the first things to consider is, if any of the enabled forecasting dimensions can be disabled.

Number of items in Item allocation keys

The Item allocation key form is accessible under the Master planning menu, as illustrated below:


Each allocation key will currently be executed in isolation on the Azure Machine Learning web service, this implies that the number of items in each allocation key, will have a direct impact on the performance of processing each allocation key.

Typically, which items are assigned to which item allocation key is a business decision, however to the extent possible try to keep number of items in each group below 1 thousand or at least in the low thousands.

Historical Horizon

The historical horizon is assigned before running the generation of the statistical baseline forecast.

The size of the historical horizon has a direct impact on the performance of the generation of the statistical forecast.

It is worth considering if historical data is representative of what is expected in the future. For example, 3 years of historical data may be available, but in some cases it can be better (result in a more accurate forecast) to use just last year's historical data. It requires insight into the historical data to make this decision but is something that should be considered.


Konference SQL Server Bootcamp 2018, Brno

$
0
0

Zajímá vás, jak SQL Server využít naplno a jak jeho méně známé funkce můžete prakticky využít ve vlastních aplikacích?

Brněnská pobočka Windows User Group připravila dvoudenní bezplatnou vzdělávací konferenci SQL Server Bootcamp 2018.

image

Akce je určena pro databázové vývojáře, administrátory i BI specialisty. Na prakticky orientovaných přednáškách předních českých odborníků na SQL Server seznámit nejen s novinkami v SQL Serveru 2017 a vNext, ale i s best-practices z různých oblastí SQL Serveru a Power BI.

Program

Připravujeme pro Vás 24 přednášek, které budou probíhat ve 2 souběžných tracích po celý den. Ovlivněte program konference i vy a aktuálně navrhněte témata, která bychom měli ještě zařadit do programu.

Program této dvoudenní konference bude zveřejněn 14 dní před konáním konference.
A ještě pro inspiraci  záznamy přednášek z minulého roku najdete zde.


Kdy a Kde

od 15. 8. 2018 08:00 do 16. 8. 2018 18:00
Fakulta elektrotechniky a komunikačních technologií VUT v Brně, Technická 12, Brno


Přednášející

Na SQL Server Bootcampu se svými přednáškami vystoupí přední čestí odborníci na SQL Server a Power BI. Těšit se můžete na přednášky od následujících přednášejících:

David Gešvindr
MVP, MCT, MCSE 

Erik Caha
MCT, MCITP, MCTS, MCPD

Jiří Neoral
MVP


Karel Rejthar
MVP


Marek Chmel
MVP, MCT, MCSE


Martin Haman


Michal Tinthofer
MCT, MCITP,
MCTS

Miloslav Peterka


Vladimír Mužný
MVP, MCT, MCSE

Registraci na konferenci a další informace

Najdete na Windows User Group stránkách konference.


Těšíme se na viděnou v Brně.
J. Burian, Microsoft 

What is ECMAScript ES (什麼是ECMAScript ES3,ES5)

$
0
0

What is ECMAScript ES (什麼是ECMAScript ES3,ES5)


1995年 Netscape Navigator網景的布蘭登·艾克開發的一種腳本語言的標準化規範;最初命名為Mocha,後來改名為LiveScript,一年後改名為JavaScript (PS.Javascript跟Java完全無關)

ECMAScript 網景在1996將Javascript提交給ECMA International歐洲電腦製造商協會,進行標準化,確認出這版語言標準

ECMAScript 2

ECMAScript 3 (ES3) 1999年發布後就長達10年沒有變動,中間是個各大瀏覽器廠商進行自己的語言延伸

ECMAScript 4 由於關於語言的複雜性出現分歧,第4版本被放棄,其中的部分成為了第5版本及Harmony的基礎

ECMAScript 5 (ES5) 2009年,此時大部分開發者仍然寫的ES3風格的javascript

有一說法是2012年因為推動停止舊版IE支援,開發者才開始大量使用ES5
ES 5之前的協定稱為ES.Harmony後來又改為ECMAScript 2015(ES2015)


ECMAScript

https://en.wikipedia.org/wiki/ECMAScript

如何 5 秒內判斷 SQL Server 是否需要更新修正程式才支援 TLS 1.2

$
0
0

情境:

程式連結 SQL Server 時會出現錯誤訊息:

    例外類型: SqlException

    例外訊息: 與伺服器的連接已成功建立,但在登入程序時發生錯誤。 (provider: SSL Provider, error: 0 - 用戶端和伺服器無法溝通,因為它們沒有公用的演算法。)

判斷方式:

SQL Server 2014 SP2 (12.0.5000.0) 或是更新版本即支援 TLS 1.2 , 無需要安裝修正程式.

另外需要安裝修正程式的資訊請參考:

https://support.microsoft.com/zh-tw/help/3135244/tls-1-2-support-for-microsoft-sql-server


Enjoy. Jacky


Office 開発におけるパフォーマンス トラブルシュート (その 2 : ボトルネックの特定)

$
0
0

こんにちは、Office 開発サポート チームの中村です。

前回の投稿で、Office 開発のパフォーマンスに関する調査の進め方をご紹介しました。その中で予告した通り、今回の記事ではボトルネックとなるコードの特定手法について、特定作業に使えるサンプル コードとともに詳しく解説していきます。

今回も、「Office バージョンアップに伴い、これまで利用していたプログラムのパフォーマンスが低下した」という場合を例に説明します。コードの掲載などのため記事が長くなりますがご容赦ください。


目次
1. 説明用サンプル プログラムの紹介
2. デバッグ ログの追加 (関数単位)
3. デバッグ ログの解析
4. デバッグ ログの追加 (行単位)
5. 関数単位の時刻ログ出力処理追加プログラム


1. 説明用サンプル プログラムの紹介

かなりシンプルな例ですが、以下の VBA マクロ (TestProgram.xlsm) を例に説明します。(この VBA マクロの内容で大きくパフォーマンスが低下するわけではありません。あくまでも調査の流れを説明するためのサンプルです。そして説明用にあえて効率の悪い処理などを書いています。)

前回の記事でも述べた通り、業務で使用するプログラムは膨大なステップ数となり、多くの場合は処理の内容ごとに関数を分け、これを呼び出すよう実装されています。今回のサンプルでは、OpenWorkBook / SetValue / ChangeFontColor / CloseWorkBook 4 つの関数を呼び出しています。

図 1. テスト プログラム実行結果

図 1. テスト プログラム実行結果


<テスト プログラム 処理概要>

ボタン コントロールをクリックすると、データ ブック (sample.xlsx) を開き、A1A3 セルの値を、このマクロ ブックの A4~A6 に転記します。その後、A4~A6 セルの書式をいくつか設定した後、ボタン コントロールの表示を「転記済み」に変更し、データブックを閉じて処理終了のメッセージボックスを表示します。


テスト プログラム コード

<Sheet1 オブジェクト>

Private Sub CommandButton1_Click()
    Dim dataFilePath As String
    Dim dataBook As Workbook
    Dim i As Integer
    
    '① マクロ ブックのシート上のデータを取得
    dataFilePath = ThisWorkbook.Worksheets(1).Range("B1").Value
    
    '② データブックをオープン
    Set dataBook = OpenWorkBook(dataFilePath)
    If dataBook Is Nothing Then
        MsgBox "データ ブックが存在しないため処理中断"
        Exit Sub
    End If
    
    '③ データブックの A1 ~ A3 の値をマクロブックの A4 ~ A6 に転記
    For i = 1 To 3
        Call SetValue(dataBook, i)
    Next
    
    Call ChangeFormat '④ 書式設定を変更
    Call CloseBook(dataBook) '⑤ データ ブックを閉じる
    
    '⑥ 処理完了時にコントロールの Caption を変更
    CommandButton1.Caption = "転記済み"
    
    MsgBox "処理終了"
End Sub

Function OpenWorkBook(filePath As String) As Workbook
    Dim wb As Workbook
    If Dir(filePath) = "" Then
        Exit Function
    End If
    
    Set wb = Workbooks.Open(filePath)
    Set OpenWorkBook = wb
End Function

Sub SetValue(dataBook As Workbook, i As Integer)
    ThisWorkbook.Worksheets(1).Range("A" & 3 + i).Value = dataBook.Worksheets(1).Range("A" & i).Value
End Sub

Sub ChangeFormat()
    With ThisWorkbook.Worksheets(1).Range("A4:A6")
        .Font.ColorIndex = 3
        .Font.Bold = True
        .Borders.LineStyle = xlDouble
        .Borders.ColorIndex = 5
    End With
End Sub

Sub CloseBook(dataBook As Workbook)
    dataBook.Close
End Sub


2. デバッグ ログの追加 (関数単位)

通常、パフォーマンスが低下したと気づいたときの出発点では、「CommandButton1_Click() 全体の処理が遅くなった」という状況から調査を開始するかと思います。この段階では、①~⑥のどこが遅くなったのか、まだ分かりません。またさらに、例えば ChangeFormat() の中であれば、いくつかの書式を変更しているので、どの書式変更が遅いのかが分かりません。

前回の記事で述べたように、ボトルネックとなる処理の内容によって、検討される対応方法は異なります。このため、まずはこのコードの中のどこが遅いのか、1 行レベルでの特定を行うことを目指します。


いきなり 1 行レベルの特定を行うのは効率が悪いので、まずは、大まかに関数単位で切り分けを行うことをお勧めします。

ここで役立つのが、「5. 関数単位の時刻ログ出力処理追加プログラム」のコードです。5. で後述する使い方に従ってこのプログラムを実行すると、先述のテスト プログラムは以下のようなコードに変更されます。


<Sheet1 オブジェクト>

Private Sub CommandButton1_Click()
LogWriteToBuffer "IN,Sheet1,CommandButton1_Click"
    Dim dataFilePath As String
    Dim dataBook As Workbook
    Dim i As Integer
    
    '① マクロ ブックのシート上のデータを取得
    dataFilePath = ThisWorkbook.Worksheets(1).Range("B1").Value
    
    '② データブックをオープン
    Set dataBook = OpenWorkBook(dataFilePath)
    If dataBook Is Nothing Then
        MsgBox "データ ブックが存在しないため処理中断"
LogWriteToBuffer "OUT,Sheet1,CommandButton1_Click"
        Exit Sub
    End If
    
    '③ データブックの A1 ~ A3 の値をマクロブックの A4 ~ A6 に転記
    For i = 1 To 3
        Call SetValue(dataBook, i)
    Next
    
    Call ChangeFormat '④ 書式設定を変更
    Call CloseBook(dataBook) '⑤ データ ブックを閉じる
    
    '⑥ 処理完了時にコントロールの Caption を変更
    CommandButton1.Caption = "転記済み"
    
    MsgBox "処理終了"
LogWriteToBuffer "OUT,Sheet1,CommandButton1_Click"

'★以下は手動で追加
LogWrite logOutputCollection
End Sub

Function OpenWorkBook(filePath As String) As Workbook
LogWriteToBuffer "IN,Sheet1,OpenWorkBook"
    Dim wb As Workbook
    If Dir(filePath) = "" Then
LogWriteToBuffer "OUT,Sheet1,OpenWorkBook"
        Exit Function
    End If
    
    Set wb = Workbooks.Open(filePath)
    Set OpenWorkBook = wb
LogWriteToBuffer "OUT,Sheet1,OpenWorkBook"
End Function

Sub SetValue(dataBook As Workbook, i As Integer)
LogWriteToBuffer "IN,Sheet1,SetValue"
    ThisWorkbook.Worksheets(1).Range("A" & 3 + i).Value = dataBook.Worksheets(1).Range("A" & i).Value
LogWriteToBuffer "OUT,Sheet1,SetValue"
End Sub

Sub ChangeFormat()
LogWriteToBuffer "IN,Sheet1,ChangeFormat"
    With ThisWorkbook.Worksheets(1).Range("A4:A6")
        .Font.ColorIndex = 3
        .Font.Bold = True
        .Borders.LineStyle = xlDouble
        .Borders.ColorIndex = 5
    End With
LogWriteToBuffer "OUT,Sheet1,ChangeFormat"
End Sub

Sub CloseBook(dataBook As Workbook)
LogWriteToBuffer "IN,Sheet1,CloseBook"
    dataBook.Close
LogWriteToBuffer "OUT,Sheet1,CloseBook"
End Sub

<Module1 オブジェクト> ※ 共通関数記述用に追加されます

Public logOutputCollection As Collection
Public Sub LogWriteToBuffer(strMsg As String)
   If logOutputCollection Is Nothing Then
      Set logOutputCollection = New Collection
   End If
   logOutputCollection.Add getNowWithMS & "," & strMsg
End Sub

Public Sub LogWrite(logOutputCollection As Collection)
    Dim j As Integer
    Dim iFileNo As Integer
    iFileNo = FreeFile
    Open "C:tempVBAPerf.log" For Append As #iFileNo
    If Not logOutputCollection Is Nothing Then
        For j = 1 To logOutputCollection.Count
           Print #iFileNo, logOutputCollection(j)
        Next
    End If
    Close #iFileNo
End Sub

Function getNowWithMS() As String
   Dim dtmNowTime      ' 現在時刻
   Dim lngHour         ' 時
   Dim lngMinute       ' 分
   Dim lngSecond       ' 秒
   Dim lngMilliSecond  ' ミリ秒
   dtmNowTime = Timer
   lngMilliSecond = dtmNowTime - Fix(dtmNowTime)
   lngMilliSecond = Right("000" & Fix(lngMilliSecond * 1000), 3)
   dtmNowTime = Fix(dtmNowTime)
   lngSecond = Right("0" & dtmNowTime Mod 60, 2)
   dtmNowTime = dtmNowTime  60
   lngMinute = Right("0" & dtmNowTime Mod 60, 2)
   dtmNowTime = dtmNowTime  60
   lngHour = Right("0" & dtmNowTime, 2)
   getNowWithMS = lngHour & ":" & lngMinute & ":" & lngSecond & "." & lngMilliSecond
End Function


Sub や Function に入った直後と出る直前に、「LogWriteToBuffer "IN またはOUT,<モジュール名>,<関数名>"」という処理が自動的に追加されているのがお分かりでしょうか。また、標準モジュールにモジュールが追加され、ログ出力関数 (LogWriteToBuffer() / LogWrite()) と、時刻をミリ秒まで取得する関数 (getNowWithMS()) が追加されます。


3. デバッグ ログの解析

この状態でプログラムを実行すると、「5. 関数単位の時刻ログ出力処理追加プログラム」の中で指定しているログ ファイル (上記では C:tempVBAPerf.log) に以下のようにログが出力されます。


<ログ出力結果 サンプル> (数値は説明用に作成しているので、実際はこんなにかかりません。)

19:08:08.562,IN,Sheet1,CommandButton1_Click
19:08:08.562,IN,Sheet1,OpenWorkBook
19:08:09.210,OUT,Sheet1,OpenWorkBook
19:08:09.210,IN,Sheet1,SetValue
19:08:10.230,OUT,Sheet1,SetValue
19:08:10.230,IN,Sheet1,SetValue
19:08:11.732,OUT,Sheet1,SetValue
19:08:12.733,IN,Sheet1,SetValue
19:08:14.221,OUT,Sheet1,SetValue
19:08:14.221,IN,Sheet1,ChangeFormat
19:08:23.123,OUT,Sheet1,ChangeFormat
19:08:23.125,IN,Sheet1,CloseBook
19:08:23.532,OUT,Sheet1,CloseBook
19:08:23.541,OUT,Sheet1,CommandButton1_Click


このログを分析してどこで時間がかかっているかを特定していきます。Excel にカンマを区切り文字として貼り付けると、Excel の機能やシート関数を使って様々な観点で分析できます。

(例)

  • 直前の処理との時間差 (=A3-A2」ような数式で求められます) を算出し、特に時間がかかっている箇所を見つける
  • 関数名のカウントを数え、繰り返し行われている処理を特定する


今回の場合、上記のログを解析すると、以下のあたりがボトルネックとなっていることが分かります。

  1. ChangeFormat 関数の IN ~ OUT の間が 1 回で 8.902 秒かかっている
  2. SetValue 関数の IN OUT の間が 3 回の合計で約 4 秒かかっている


4. デバッグ ログの追加 (行単位)

SetValue 関数の中は 1 行しか処理がないのでこれ以上の切り分けは必要ありませんが、ChangeFormat 関数の中ではいくつかの処理を行っているので、さらにボトルネックとなる処理を特定します。ここは手動で 1 行ごとにログを追加します。関数内のコード量に応じて、いきなり 1 行単位にログを追加するのではなく、何段階かに分けて絞り込んでも良いかと思います。

ログ追加の例

Sub ChangeFormat()
LogWriteToBuffer "IN,Sheet1,ChangeFormat"
    With ThisWorkbook.Worksheets(1).Range("A4:A6")
        .Font.ColorIndex = 3
LogWriteToBuffer "①,Sheet1,FontColorIndex"
        .Font.Bold = True
LogWriteToBuffer "②,Sheet1,FontBold"
        .Borders.LineStyle = xlDouble
LogWriteToBuffer "③,Sheet1,BorderLineStyle"
        .Borders.ColorIndex = 5
LogWriteToBuffer "④,Sheet1,BorderColorIndex"
    End With
LogWriteToBuffer "OUT,Sheet1,ChangeFormat"
End Sub

このようにログを追加したプログラムを再度実行し、3. と同じようにログを解析していきます。

: 本記事のログ出力処理追加サンプルプログラムでは、1 回の Excel 起動で複数回現象再現処理が実行されることは想定していません。(出力ログのコレクションが前回実行分と重複します) 実行の都度、Excel プログラムを開き直してください。


対応方法の検討について

これについては前回の記事で詳しく説明しているため今回はあまり触れませんが、例えば Font.ColorIndex の設定箇所が遅かったとします。この場合、前回の記事でいう3-1. ボトルネックとなる処理の速度改善として、Font.ColorIndex の代わりに Font.Color だったらどうか?などを試すことが検討できます。また、システム全体の流れによっては、マクロ ブックのテンプレートの段階でフォント色を設定しておき、マクロ内では変更しないといった対応も検討できるかもしれません。

SetValue については、ループ処理ではなく複数セルをまとめて貼り付けることが効果的です (前回記事 3-2. プログラム構成の見直し に当たります)

また、もし例えば⑤のコントロールの Caption 変更が遅いようであれば、フォーム コントロールに変更したらどうか (前回記事 3-1. ボトルネックとなる処理の速度改善)Caption 変更以外の方法で処理完了が分かるようにできないか (前回記事 3-2. プログラム構成の見直し)、などの対応方法が検討できます。


5. 関数単位の時刻ログ出力処理追加プログラム

2. プログラム上のボトルネックの特定 で触れた、関数単位にログ出力処理を自動追加できるサンプル コードを以下に記載します。VBA の標準モジュールなどにコピーして利用できます。

なお、このサンプル コードはあらゆる VBA 上の記述方法に対応することを保証するものではありません。必要に応じて、お客様ご自身で修正してご利用ください。


利用上の諸注意

  • このサンプル コードの実行時、ログ出力処理を追加する対象のファイルを開く Office アプリケーションのオプション設定で、[セキュリティ センター] – [セキュリティ センターの設定] – [マクロの設定] – [VBA プロジェクト オブジェクト モデルへのアクセスを信頼する] を有効にする必要があります。(パフォーマンス計測時には有効にする必要はありません)
  • VBAProject を参照・変更するため、VBAProject のパスワードは解除してください。
  • ご利用の際は、AddToLogFunc() 内初めの 2 行の Const 定義をご自身の環境に合わせて変更してください。
  • VBA 関数がどの順序で呼び出されるかは判断できないため、処理全体の最後に行うログのファイル出力処理呼び出しが含まれていません。手動で、処理全体の最後に「LogWrite logOutputCollection」 を追加してください。(2. のサンプルでは CommandButton1_Click() の最後に「'★以下は手動で追加」とコメントを入れている箇所です。)


利用手順

事前準備 : 上記の通り、Excel のオプション変更と VBAProject のパスワード解除を行っておきます。

  1. 新規 Excel ブックの標準モジュールに以下のサンプル コードを貼り付けます。
  2. AddToLogFunc() 内の Const 定義をご自身の環境に合わせて変更します。
  3. AddToLogFunc() を実行します。ログ追加対象ファイルが開かれ、ログの追加が行われます。
  4. "ログ出力処理追加完了 : 該当ファイルを別名で保存し、VBA の内容に問題がないか確認してください" と表示されたらVBE でログ追加対象ファイルのコードを開き、現象再現手順の処理全体の最後に「LogWrite logOutputCollection」を追記します。
  5. ログ追加対象ファイルに別名を付けて保存します。
  6. Excel をいったん閉じ、ログを追加したファイルを再度開いて再現手順を実行します。
  7. 出力されたログファイル (手順 2. で設定したファイル パスに出力) を開き、ログを解析します。


サンプル コード

'2018/7/12 公開版
'注 : このログ追加コードは、":" を用いて複数行を 1 行にまとめたコードには対応していません。

'Exit Sub / Exit Function へのログ出力処理追加
Function CheckExit(CurrentVBComponent As Object, strProcName As String, InProcCurrentLine As Long)

    Dim strCurrentCode As String
    Dim FoundPos As Long

    strCurrentCode = Trim(CurrentVBComponent.CodeModule.Lines(InProcCurrentLine, 1))

    'コメント行は除外
    If Left(strCurrentCode, 1) = "'" Or UCase(Left(strCurrentCode, 4)) = "REM " Then
        Exit Function
    End If

    'If xxx Then Exit Sub のような行の先頭以外に Exit がある書き方を考慮し InStr で合致確認
    FoundPos = InStr(strCurrentCode, "Exit ")
    
    '"Exit " に合致しても以下のケースは除外
    'a) Exit Sub の位置が先頭以外で、前にスペースがなく "xxxExit " のように文字列がある場合
    'b) 行の途中からコメントで、コメント部分に "Exit " がある場合
    'c) "Exit Sub" と "Exit Function" 以外の "Exit aaa" のような場合
    If FoundPos > 0 Then
        If (FoundPos > 1 And InStr(strCurrentCode, " Exit ") = 0) _
            Or (InStr(strCurrentCode, "'") > 0 And InStr(strCurrentCode, "'") < FoundPos) _
            Or (InStr(strCurrentCode, "Exit Sub") = 0 And InStr(strCurrentCode, "Exit Function") = 0) Then
            FoundPos = 0 'Exit Sub / Exit Function は見つからなかったものとみなす
        End If
    End If

    'Exit Sub / Exit Function のいずれかがある場合、その前に関数を抜けるログ出力処理追加
    If FoundPos > 0 Then
    
        'If xxx Then Exit Sub の書き方を考慮しコード整形
        If Left(strCurrentCode, 3) = "If " Then
        
            'いったん End If を入れる (If xxx Then Exit Sub + 改行 + End If)
            strCurrentCode = strCurrentCode & vbCrLf & "End If"
            
            '以下のように If 文を分割してコードを置き換え
            'Exit Sub の手前まで (If xxx Then )
            'ログ出力 (LogWriteToBuffer "OUT : " & CurrentVBComponent.Name & " : " & strProcName & "")
            'Exit Sub 以降 (Exit Sub + 改行 + End If)
            CurrentVBComponent.CodeModule.ReplaceLine InProcCurrentLine, _
                        Left(strCurrentCode, FoundPos - 1) & vbCrLf & _
                        "LogWriteToBuffer ""OUT," & CurrentVBComponent.Name & "," & strProcName & """" & vbCrLf & _
                        Mid(strCurrentCode, FoundPos)
        Else
            'その他通常の Exit の場合は直前に関数を抜けるログ追加
            CurrentVBComponent.CodeModule.InsertLines InProcCurrentLine, "LogWriteToBuffer ""OUT," & CurrentVBComponent.Name & "," & strProcName & """"
        End If
    End If
    
End Function


'メイン モジュール
Sub AddLogToFunc()
    
    '****************************************************
    'お客様環境に合わせて書き換えてください
    Const szBookFile = "C:worktestProgram.xlsm" 'ログ出力処理を追加するファイルのフルパス
    Const szLogFile = "C:workVBAPerf.log" 'ログ出力ファイルのフルパス
    '****************************************************
    
    Const vbext_ct_StdModule = 1 'VBComponent Type 定数 : 標準モジュール
    Const vbext_pk_Proc = 0 'prockind 定数 : プロパティ プロシージャ以外のすべてのプロシージャ
    
    Dim xlBook As Workbook
    Dim CurrentVBComponent As Object 'VBComponent
    Dim TotalLine As Long
    Dim CurrentLine As Long
    Dim strProcName As String
    Dim strCurrentCode As String
    Dim ProcStartLine As Long
    Dim ProcEndLine As Long
    Dim InProcCurrentLine As Long
    Dim FoundPos As Long
    Dim strFunc As String
    
    Application.EnableEvents = False
    
    Set xlBook = Workbooks.Open(szBookFile) 'ログ出力処理追加対象ブック オープン

    ' 対象ブックに含まれる各モジュール内関数の最初と最後にログ出力関数呼び出しを追加
    For Each CurrentVBComponent In xlBook.VBProject.VBComponents
    
        TotalLine = CurrentVBComponent.CodeModule.CountOfLines
        
        'コード末尾から 1 行ごとに確認
        For CurrentLine = TotalLine To 1 Step -1
        
            strProcName = CurrentVBComponent.CodeModule.ProcOfLine(CurrentLine, vbext_pk_Proc) 'その行が属するプロシージャ名を取得
            strCurrentCode = LTrim(CurrentVBComponent.CodeModule.Lines(CurrentLine, 1))
            
            'End で始まる場合 : そのプロシージャの初めと終わりに処理追加
            If strProcName <> Empty And Left(strCurrentCode, 4) = "End " Then
            
                ProcStartLine = CurrentVBComponent.CodeModule.ProcBodyLine(strProcName, vbext_pk_Proc) + 1 'プロシージャの先頭行を取得
                ProcEndLine = CurrentLine
                
                'End 行の前に関数を抜けるログ出力処理追加
                CurrentVBComponent.CodeModule.InsertLines ProcEndLine, "LogWriteToBuffer ""OUT," & CurrentVBComponent.Name & "," & strProcName & """"
                'プロシージャ開始行の直後に関数に入るログ出力処理追加
                CurrentVBComponent.CodeModule.InsertLines ProcStartLine, "LogWriteToBuffer ""IN," & CurrentVBComponent.Name & "," & strProcName & """"
                
                'さらにこのプロシージャ内の途中で処理追加すべき箇所 (Exit Sub / Exit Function) をチェック
                '(OUT ログ追加により CurrentLine は End Sub の 1 行前を指す)
                For InProcCurrentLine = CurrentLine To ProcStartLine Step -1
                    CheckExit CurrentVBComponent, strProcName, InProcCurrentLine
                Next
                
                'このプロシージャの処理は終わっているためプロシージャ先頭までスキップ
                CurrentLine = ProcStartLine - 1
                
            End If
        Next
    Next

    '*************************************************************************
    'サブ関数追加処理
    '*************************************************************************
    
    ' ファイル出力時のディスク アクセスによるパフォーマンス影響を抑えるため、
    ' 処理実行中のログはいったん配列に書き込み、最後にファイル出力する

    'ログを配列に格納するための関数
    strFunc = "" & vbCrLf & _
              "Public logOutputCollection As Collection" & vbCrLf & _
              "Public Sub LogWriteToBuffer(strMsg As String)" & vbCrLf & _
              "   If logOutputCollection Is Nothing Then" & vbCrLf & _
              "      Set logOutputCollection = New Collection" & vbCrLf & _
              "   End If" & vbCrLf & _
              "   logOutputCollection.Add getNowWithMS & "","" & strMsg" & vbCrLf & _
              "End Sub"

    '配列からログファイルへの出力のための関数
    strFunc = strFunc & vbCrLf & _
              "" & vbCrLf & _
              "Public Sub LogWrite(logOutputCollection As Collection)" & vbCrLf & _
              "    Dim j As Integer" & vbCrLf & _
              "    Dim iFileNo As Integer" & vbCrLf & _
              "    iFileNo = FreeFile" & vbCrLf & _
              "    Open ""[LOG_FILE]"" For Append As #iFileNo" & vbCrLf & _
              "    If Not logOutputCollection Is Nothing Then" & vbCrLf & _
              "        For j = 1 To logOutputCollection.Count" & vbCrLf & _
              "           Print #iFileNo,  logOutputCollection(j)" & vbCrLf & _
              "        Next" & vbCrLf & _
              "    End If" & vbCrLf & _
              "    Close #iFileNo" & vbCrLf & _
              "End Sub"


    '現在時刻取得関数
    strFunc = strFunc & vbCrLf & _
              "" & vbCrLf & _
              "Function getNowWithMS() As String" & vbCrLf & _
              "   Dim dtmNowTime      ' 現在時刻" & vbCrLf & _
              "   Dim lngHour         ' 時" & vbCrLf & _
              "   Dim lngMinute       ' 分" & vbCrLf & _
              "   Dim lngSecond       ' 秒" & vbCrLf & _
              "   Dim lngMilliSecond  ' ミリ秒" & vbCrLf & _
              "   dtmNowTime = Timer" & vbCrLf & _
              "   lngMilliSecond = dtmNowTime - Fix(dtmNowTime)" & vbCrLf & _
              "   lngMilliSecond = Right(""000"" & Fix(lngMilliSecond * 1000), 3)" & vbCrLf & _
              "   dtmNowTime = Fix(dtmNowTime)" & vbCrLf & _
              "   lngSecond = Right(""0"" & dtmNowTime Mod 60, 2)" & vbCrLf & _
              "   dtmNowTime = dtmNowTime  60" & vbCrLf & _
              "   lngMinute = Right(""0"" & dtmNowTime Mod 60, 2)" & vbCrLf & _
              "   dtmNowTime = dtmNowTime  60" & vbCrLf & _
              "   lngHour = Right(""0"" & dtmNowTime, 2)" & vbCrLf & _
              "   getNowWithMS = lngHour & "":"" & lngMinute & "":"" & lngSecond & ""."" & lngMilliSecond" & vbCrLf & _
              "End Function"


    strFunc = Replace(strFunc, "[LOG_FILE]", szLogFile) '冒頭で設定したログファイル パスに書き換え
    xlBook.VBProject.VBComponents.Add(vbext_ct_StdModule).CodeModule.AddFromString strFunc '新しい標準モジュールを作成し関数を追記

    Application.EnableEvents = True
    
    MsgBox "ログ出力処理追加完了 : 該当ファイルを別名で保存し、VBA の内容に問題がないか確認してください"
    
End Sub


今回の投稿は以上です。

本情報の内容 (添付文書、リンク先などを含む) は、作成日時点でのものであり、予告なく変更される場合があります


Azure DevOps Projects general availability

$
0
0

During our Connect(); 2017 event, we announced the public preview of Azure DevOps Projects to help customers start running applications on any Azure service in just three steps.

Today, we're excited to announce that Azure DevOps Projects is now generally available in the Azure Portal, making it easier for developers to deploy to the Azure cloud and create CI/CD pipelines with pre-configured resources and best practices.

Once you select an application language, a runtime, and an Azure service, Azure DevOps Projects sets up everything you need for developing, deploying, and monitoring your application, including:

  • All necessary Azure resources
  • Git repository with application code
  • Automated CI/CD pipeline
  • Application Insights integration for monitoring applications
  • A DevOps Project dashboard that lets you monitor code commits, builds and, deployments, from a single view in the Azure portal
  • A VSTS account and Project

We’ve incorporated your feedback from our public preview and have continued to add features to DevOps Project. Using DevOps Projects, you can now deploy not only to Web App (Container, Windows, Linux) but also to Azure Kubernetes Service, Azure Service Fabric Mesh, Virtual Machines and Azure SQL Database. We have also added support for Ruby and Go in addition to .NET, .NET Core, Java, PHP, Node, and Python.

We will continue our commitment to Azure DevOps Projects to ensure app deployment is fast and painless for every developer who uses our platform, regardless of their framework or chosen Azure resources.

Go ahead and create an Azure DevOps Project today. For more information, please visit https://azure.microsoft.com/en-us/features/devops-projects/.

Simakov’s Click the button – Small Basic Featured Program

Use VS Code as IoT Hub Device Simulator — Say Hello to Azure IoT Hub in 5 Minutes

$
0
0

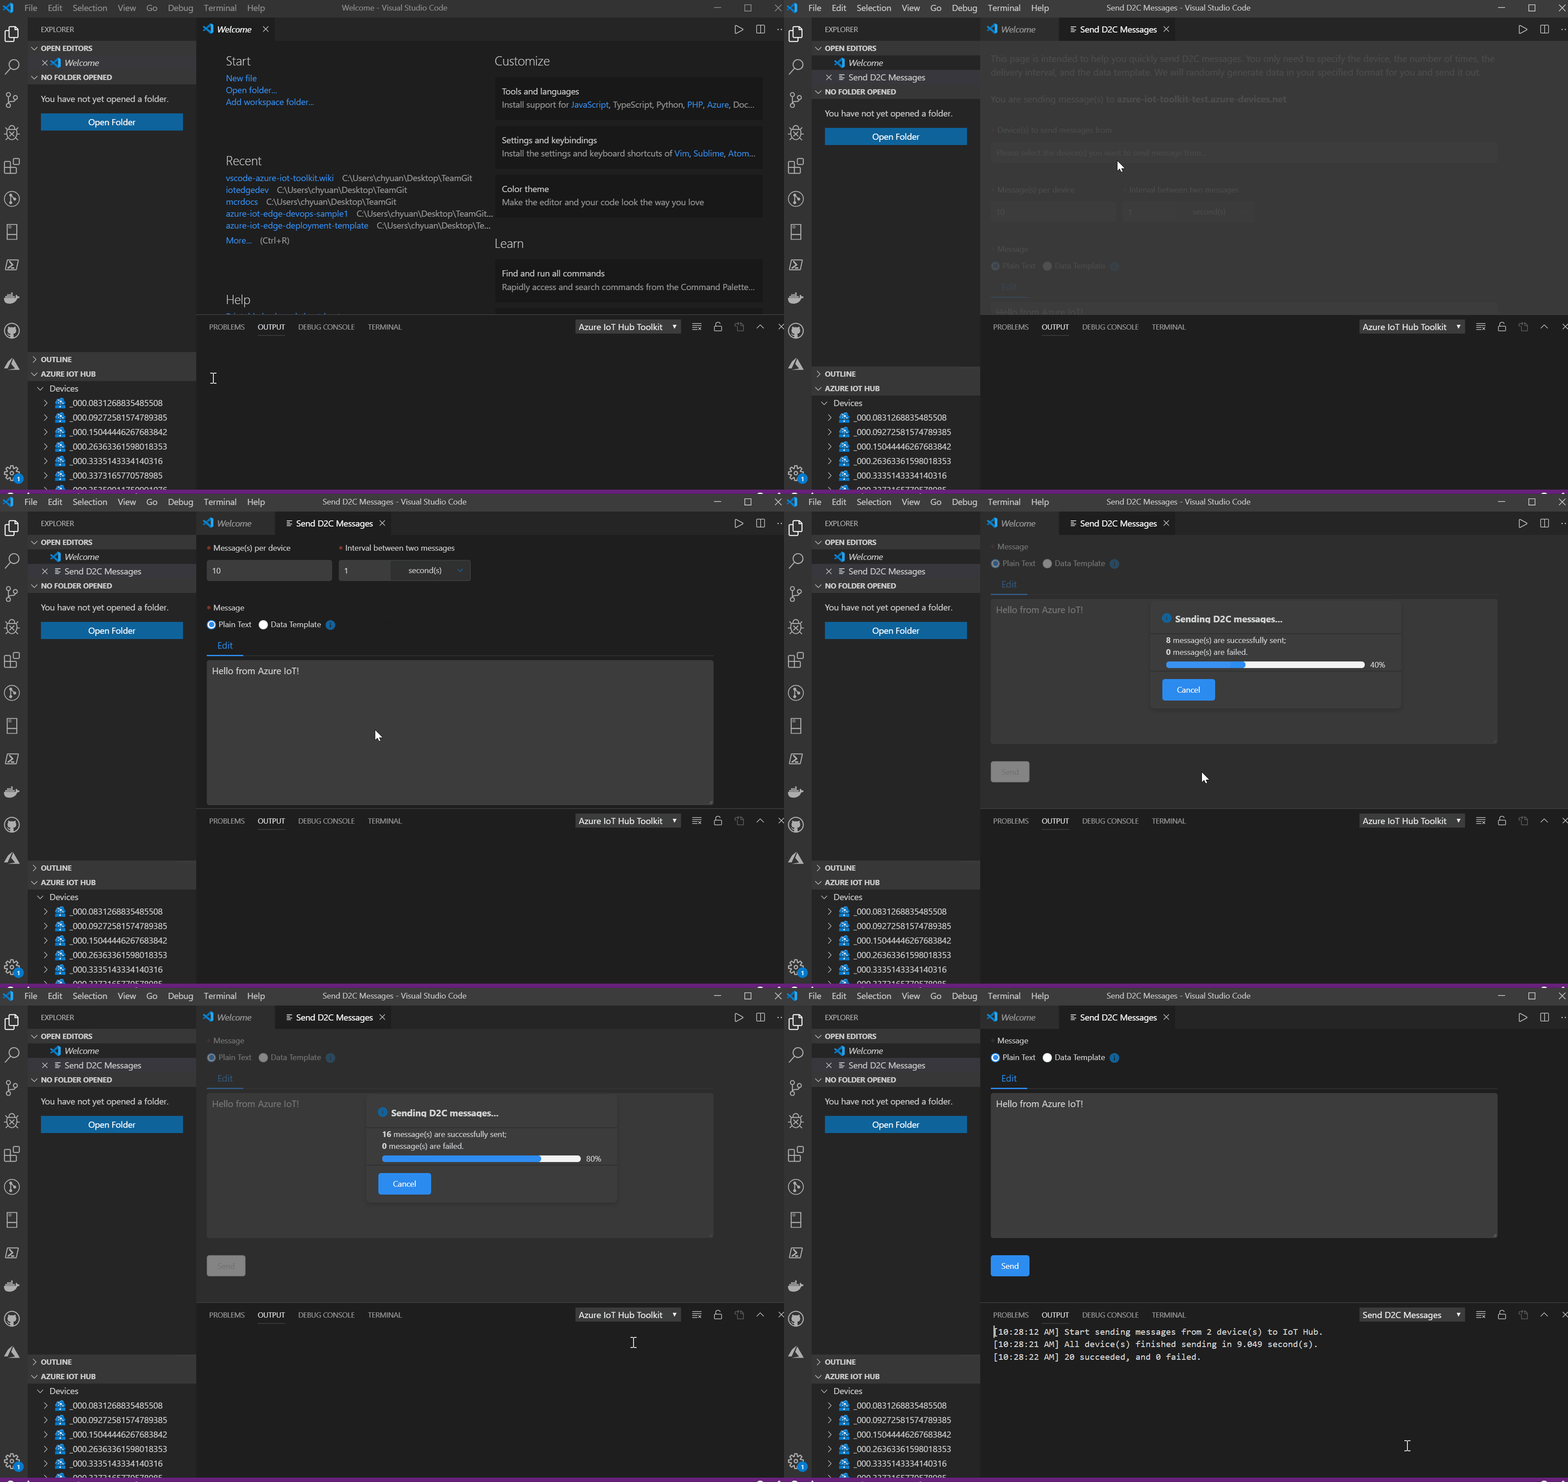
When doing development for Azure IoT solutions, developers may want to test and debug his cloud solution with a real device. However, not every developer has a real device in his hand.  With the Azure IoT Toolkit extension for Visual Studio Code, you could easily use VS Code as a device simulator to quickly interact with Azure IoT Hub. Let's see how easy it is to send a D2C (device-to-cloud) in VS Code! Say Hello to IoT Hub in VS Code in 5 minutes!

Prerequisites

  1. If you don’t have an Azure subscription, create a free account before you begin.
  2. Install the Visual Studio Code extension Azure IoT Toolkit.

Create an IoT hub

The first step is to create an IoT hub in your subscription from VS Code.

  1. Click ... > Create IoT Hub at AZURE IOT HUB DEVICES tab, or type Azure IoT Hub: Create IoT Hub in Command Palette. (If you want to use an existing IoT Hub, Click ... > Select IoT Hub at AZURE IOT HUB DEVICES tab)
  2. Choose your subscription, resource group, and the closest deploy location to you.
  3. For Pricing and scale tier, select the F1 - Free tier if it's still available on your subscription.
  4. Enter the name of your IoT Hub.
  5. Wait a few minutes until the IoT Hub is created. you can see that your devices status become No device in ....

create hub

Register a device

A device must be registered with your IoT hub before it can connect.

  1. Click ... > Create Device at AZURE IOT HUB DEVICES tab, or type Azure IoT Hub: Create Device in Command Palette.
  2. Enter device ID and press Enter.
  3. Wait a few seconds until the new device is created.

create device

Say Hello to IoT Hub (Send D2C message)

Right-click your device and select Send D2C message to IoT Hub, then enter the message, results will be shown in OUTPUT > Azure IoT Toolkit view. Your 'Hello World' is sent to Azure IoT Hub!

send d2c

Monitor IoT Hub D2C message in VS Code

While you could send message to your IoT Hub, it is also possible to monitor those message in VS Code.

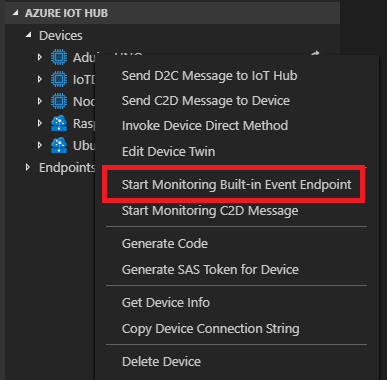
  1. Right-click your device and select Start Monitoring D2C Message.

start monitor

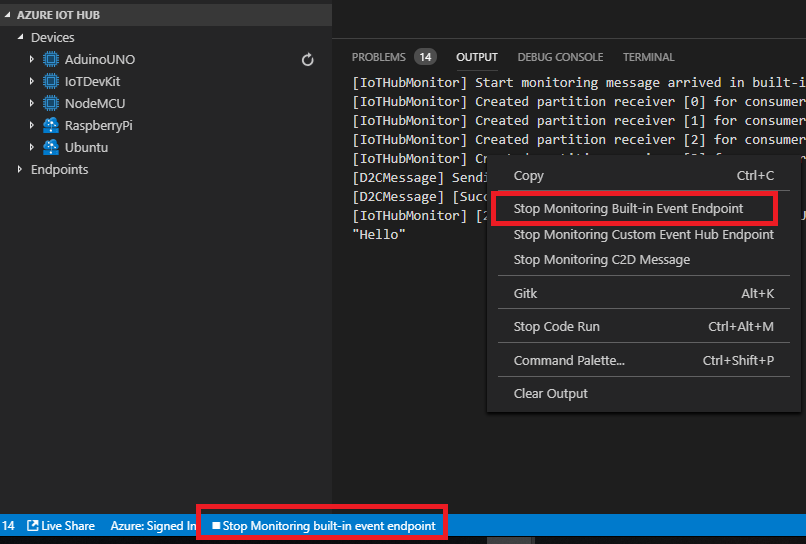
  1. The monitored messages will be shown in OUTPUT > Azure IoT Toolkit view.
  2. To stop monitoring, right-click the OUTPUT view and select Stop Monitoring D2C Message.

stop monitor

Is that cool? You could send and receive messages for Azure IoT Hub very easily in VS Code. Is that all? Not yet! Actually, you could use Azure IoT Toolkit extension to do lots of things when you develop with Azure IoT Hub! Checkout with our Wiki Page to see the full features and tutorials. Azure IoT Toolkit makes your Azure IoT development easier.

Useful Resources:

PowerShell script to execute DOS commands using KUDU APIs

$
0
0


Lets say you would like to get the machine name from all VM instances that are running your Azure AppService website or you would like to create a folder under the wwwroot, this below sample PowerShell scripts can execute any DOS command


#Login-AzureRmAccount

$resoureGroupName = "wabac"
$websiteName = "wabacblue"

$env = @{
    command= 'Set COMPUTERNAME'
    dir= 'site'
}
$json = $env | ConvertTo-Json

$env2 = @{
    command= 'mkdir vdir'
    dir= 'sitewwwroot'
}
$json2 = $env2 | ConvertTo-Json

$website = Get-AzureWebsite -Name $websiteName
$username = $website.PublishingUsername
$password = $website.PublishingPassword
$base64AuthInfo = [Convert]::ToBase64String([Text.Encoding]::ASCII.GetBytes(("{0}:{1}" -f $username,$password)))
$apiBaseUrl = "https://$($website.Name).scm.azurewebsites.net/api"

[System.Uri]$Uri = $apiBaseUrl

$instances = Get-AzureRmResource -ResourceGroupName $resoureGroupName `
                                    -ResourceType Microsoft.Web/sites/instances `
                                    -ResourceName $websiteName `
                                    -ApiVersion 2018-02-01


foreach($instance in $instances)
{
    $instanceName = $instance.Name
    Write-Host "`tVM Instance ID `t`t: " $instanceName

    #Now execute 'SET COMPUTER' cmd
    $cookie= New-Object System.Net.Cookie
    $cookie.Name = "ARRAffinity"
    $cookie.Value = $instanceName
    $Cookie.Domain = $uri.DnsSafeHost
    $session=New-Object Microsoft.Powershell.Commands.WebRequestSession
    $session.Cookies.add($cookie)

    $response = Invoke-RestMethod -Uri "$apiBaseUrl/command" `
                                    -Headers @{Authorization=("Basic {0}" `
                                    -f $base64AuthInfo)} `
                                    -Method Post -Body $json `
                                    -ContentType 'application/json' `
                                    -WebSession $session
    Write-Host "`tVM Instance Name `t: " $response

    $response = Invoke-RestMethod -Uri "$apiBaseUrl/command" `
                                    -Headers @{Authorization=("Basic {0}" `
                                    -f $base64AuthInfo)} `
                                    -Method Post -Body $json2 `
                                    -ContentType 'application/json' `
                                    -WebSession $session
    Write-Host "`tCreate folder Results `t: " $response
}

[Power BI] カスタム ビジュアルの作成方法 R + Plotly 編

$
0
0

Microsoft Japan Data Platform Tech Sales Team

大塚

Power BI では組み込みのビジュアルを使用してデータの可視化を簡単に行えるのが一つの利点ですが、 「カスタム ビジュアル」 という機能で簡単にサードパーティ(Microsoft 製含む)のビジュアルや独自のビジュアルを作成、組み込むことが可能です。 この機能によりビジュアル「だけ」作成することはもちろん、R のプロット機能、または R + Plotly のプロット機能を使ったオリジナルの 「アナリティクス+ビジュアル」 を作成して使用することも可能になります。

1. R と Plotly

R とは、主にターミナル画面で実行する記述統計、予測分析、機械学習を行うための言語環境です。R の大きな特徴として、パッケージと呼ばれる命令セットの中に上記のような統計、機械学習機能の他に、データや予測結果データの可視化を行う 「plot」(本体に付属)や「ggplot2」(ggplot)と呼ばれる可視化パッケージがあります。plot も ggplot も Power BI の「R スクリプト ビジュアル」から直接実行することができ、Power BI のフィルタやスケールの機能にも対応します。が、非常に複雑な書式が要求されるうえ、静的な可視化のみ対応する(png形式で出力されます)ため、グラフ内でのデータ絞り込みやグラフ上にマウスをホバーした際の値の取得のようなインタラクティブな機能や、グラフの一部を拡大するなどの可視化支援機能は利用できません。

その点「Plotly」という可視化ライブラリでは、非常に単純な書式で複雑なグラフを作成することが可能です。またライブラリのみでインタラクティブ機能、リアルタイム描画機能が利用できるため、ユーザーの様々な要求に応えることが可能です。

Rについての日本語での解説は こちら のページをご覧ください。このページは R の黎明期から利用されている有志による日本語解説サイトです。また Plotly については こちら のページに詳細が説明されています。


2.カスタム ビジュアル作成の流れ

カスタムビジュアルは以下の流れで作成します。

  • 事前準備
    Power BI のカスタムビジュアルを作成する上で必要になるツール類のインストールを行います。
  • カスタム ビジュアル プロジェクトの作成
    pbiviz というツールを使って「カスタム ビジュアル プロジェクト」というファイルセットを作成します。
  • カスタム ビジュアル の作成
    実際にカスタム ビジュアルを作成します。R、Plotly でのスクリプトを記述後、Power BI Service でテストを行い、必要に応じてパッケージの作成、インストールを行います。


一度環境を作成してしまえば、以下の流れで簡単に新しいカスタム ビジュアルを作成することが可能です。

  1. pbibiz new でのプロジェクトの作成
  2. R 及び Plotly によるコードの記述
  3. pbiviz start によるビジュアル サーバーの起動
  4. Power BI Service でのテスト実施
  5. pbiviz package によるパッケージ作成
  6. パッケージのインストール

3.カスタムビジュアルの作成例

Power BI Desktop での R + Plotly のビジュアル作成例です。

CaptureSample

また Power BI Service 上でもこのようなビジュアルが利用できるようになります。

CaptureSampleService


4.実際の作成方法について

いかがでしたか?デフォルトの Power BI でもかなりの表現は可能ですが、R と Plotly を使うことで更に可視化の表現が広がるかと思います。ここではスペースの都合でカスタム ビジュアルの作成方法の詳細は掲載できませんでしたが、以下の Github 上に実際の手順とサンプルスクリプトを用意しております。ご興味ありましたら是非チャレンジしてみてください!

R + Plotly によるカスタム ビジュアル作成方法

https://github.com/c-nova/pbipltly

カスタム ビジュアルそのものをもっと知りたい方は、以下の Qiita の連載記事も非常に参考になります。こちらも併せてご参照ください。特に capability.json の詳細などを日本語化して説明されているので、理解が深まるかと思います。

Power BI カスタムビジュアル開発

https://qiita.com/kenakamu/items/f57ab7f73d6ea10bc9d9


WIP Your Product into Shape

$
0
0

In his latest post, Senior Consultant, Assaf Stone shares some useful suggestions on tracking Work In Progress (WIP) in VSTS.


What is WIP?

Enjoy-Drink-Cozy-Cappuccino-Cup-Coffee-Cream-703146WIP simply means work in process (also sometimes, Work In Progress). This metric simply measures how many items (features, stories, backlog items, tasks) your team have started to develop, but have yet to complete. In other words, how many items are currently being developed. This simple metric is extremely important, and a useful number to track and control. In this post we will discuss the reasons for limiting your WIP, how to do so, and how to track your work in process using VSTS.


Read the full post on Assaf’s blog

What is your Agile?

$
0
0

In this post, Senior Application Manager, AJ Weaver talks about the many interpretations of Agile.


First, let me start by saying that when I am talking about Scrum, I am not necessarily talking about Agile. All Scrum is Agile but not all Agile is Scrum. As you can see below, Scrum is just one cornerstone of Agile. The term is misused and abused across by pretty much all organizations, but I believe it is very important for organizations to clarify what they mean by “Agile”. I have heard many people define Agile over the past 20+ years of my software development life. Sometimes people like to define Agile as “not documenting things”. Other times, folks use the word Agile to make it seem as they are more responsive to customers. Most of the times, when people say they are Agile they really mean they are implementing a form of Scrum or Kanban. Other times, sales teams use it for marketing when their software teams are not Agile at all!

clip_image001

In my opinion, looking at the illustration above, organizations should pick the pillars of Agile they want to implement, communicate the pillars they use and make sure the organization understands it. For example, if your definition of Agile is: Scrum, Continuous Integration, Continuous Delivery, and Behavior Driven Development, then it should be documented and understood by all in your area of influence. That way when people speak about Agile, they have a concrete definition of what that means and are speaking apples to apples. 

That being said, your Agile definition may be different than others Agile definition. That is okay. Agile is a high-level conceptual idea with different pillars stemming from 30+ years of software development coming from Lean, XP, Manufacturing, etc. So, let me ask you...  What is your Agile? Premier Support for Developer can help you define your Agile and can get your team functioning at the highest level. Please contact us and we can discuss what Agile means to you as well as provide you with best-practice industry experience to achieve the highest level of productivity in your Agile environment.


Premier Support for Developers provides strategic technology guidance, critical support coverage, and a range of essential services to help teams optimize development lifecycles and improve software quality. Contact your Application Development Manager (ADM) or email us to learn more about what we can do for you.

Learn for Free KQL–the language Log Analytics and other services use

$
0
0


KQL, the Kusto Query Language, is used to query Azure's services. This course will teach you the basic syntax of KQL, then cover advanced topics such as machine learning and time series analysis, as well as exporting your data to various platforms.


https://www.pluralsight.com/courses/kusto-query-language-kql-from-scratch

I've been using KQL for quite a while, but still found this course useful, there were some operators I’d never used and I think I have a better understanding of JOINS and UNIONS now. 

I particularly like the pace of the delivery, the practical examples and also the way Robert lays out the syntax in a very readable way.  You can also download the code samples (open the .CSL files in Notepad) and slides for your reference.

Release Manager connection errors when calling Azure Resource Manager in multiple regions – 07/13 – Investigating

$
0
0

Initial notification: Friday, July 13th 2018 10:00UTC

We're investigating a recurrence of failures when deploying to Azure or calling ARM APIs using Release Manager in multiple regions.
We are working with Azure to determine the cause and potential mitigation of the issue. The most common errors users may experience are TaskCancelledException, operation timed out, or "an error occurred while sending the request" when sending the request to Azure.

We are sorry for this disruption in service and we are in the process of resolving the issue soon.

  • Next Update: Before Friday, July 13th 2018 11:30UTC

Sincerely,
Kalpana

Introducing Surface Go! – Perfect for Education

$
0
0

Our lightest, fastest and most affordable Surface 2 in 1 laptop yet!

On July 10th, Microsoft proudly announced the arrival of a new addition to the Surface family, the Surface Go! As Educators, many of us play different roles throughout the day, moving from classroom to classroom to planning engaging lesson at home. A tethered desktop laptop can prevent us from being agile and we want ways to boost productivity and tackle the teacher work load. The Surface team strive to adapt to this dynamic way of working and to strike a balance between performance and versatility of a laptop. We are encouraging our students to work in a variety of ways and that can be possible with the right device! Pioneering a 2:1 model can provide the mobility of a tablet with the performance of a laptop, inspiring new ways of creating and delivering in the classroom. 

Quick Fire Education Stats:

-          10” Screen, weighing 1.15 pounds and 8.3mm thin

-          Starting at £379

-          High-resolution PixelSense Display

-          Built to watch videos, create art or edit photos

-          Designed to scale most school textbooks for comfort in portrait and landscape mode

-          Writing on the screen feels natural

-          Built for Microsoft 365 Education experience

-          Perfect for using 3D and Mixed Reality experiences within Windows 10 in S-Mode

-          Read or watch in Tablet Mode, type on Laptop Mode and draw in Studio Mode

-          Enjoy better accuracy with an extra-large trackpad


What are the benefits?

Having a 2:1 device means that you will be able to not only use it as a laptop for planning, data and email; it also serves as a tablet for delivering content in the classroom without being tethered to the front of the classroom. This agile model ensures all students are engaged with their work and responding to live feedback in a 21st century delivery of teaching and learning with the Surface Go at the heart of it!


Can I use Office 365 with the Surface Go?

The Surface Go has been built to provide a high-quality experience of using Office 365, completely cloud based. For schools looking to migrate to cloud, having a powerful device that can run these applications benefits not only educators, but students. Sway away with building presentations, take digital notes with OneNote and import 3D models into PowerPoint. Performance and reliability have not been compromised for this powerful new addition to the Surface family!


How will students benefit?

Whether they’re collaborating in groups or mapping the edges of the universe, Surface Go helps students achieve better and varied outcomes with it’s premium 2-in-1 device that balances the performance and portability they need. Enhanced Lesson customisation with Office 365 and seamless tools like Microsoft Teams enable assignment creation, progress tracker and more!


Supporting more inclusive Classrooms!

At the heart of Microsoft Education, accessibility is built in, never bolt on! Customising the experience for users is easy to manage and configuration saved for when they sign on for a personalised learning experience and outcome. Every student has the right to learn and the design of the Surface Go showcases the best of Microsoft Education’s inclusive learning tools like Immersive Reader, Accessibility Checker and Microsoft Translator.


Education institutions who are interested in finding out more and how they can get tailored, early access should reach out to one of our ‘Microsoft Education Experts’ - https://info.microsoft.com/ww-landing-microsoft-education-contact-us.html


[Mitigated] Customers were not able to create new Azure AD B2C Directories

$
0
0

Between 01:00 AM 7/13 UTC and 06:30 PM 7/13 UTC most customers were not able to create a Azure AD B2C directory in the Azure Portal.  The issue has been mitigated and customers are able to create new B2C directories now.

The error was "Unable to complete due to service connection error, please try again later".

We apologize for the inconvenience and are taking necessary steps to prevent future reoccurrence. There was no impact on existing B2C directories management and authentication scenarios.

A simpler and faster way to publish your Desktop Bridge applications on the Microsoft Store

$
0
0

If you have ever tried to publish a Desktop Bridge application on the Store, you would have seen a similar message after uploading your package on the Dev Center:

Package acceptance validation error: You don't have permissions to specify the following namespaces in the appx manifest file of the package ExpenseItDemo.Package_1.1.0.0_x64.appx: restricted namespace: http://schemas.microsoft.com/appx/manifest/foundation/windows10/restrictedcapabilities

Package acceptance validation error: Your developer account doesn’t have permission to submit apps converted with the Desktop Bridge at this time. https://aka.ms/desktopbridgeforwindowsstore

The reason is that Desktop Bridge applications use a restricted capability called runFullTrust, which allows them to access to all the available Windows resources so that most of the Win32 code will just work as it is. In order to access a restricted capability, you typically need to pass an extra vetting process or reach the Dev Center support team. If your request is approved, the restriction will be unlocked for your account, so that the next time you submit your package you won’t see anymore this error. Specifically for the runFullTurst validation, this process was handled by the Windows AppConsult team. After filling the nomination form linked in the message, one engineer would have reached you back to ask more information about your application and a copy of your package. After that, he would have tested it if it’s compliant from a technical and a Store policy point of view and, if everything is in order, he would have granted you the required permission so that you could complete the submission.

The process helps to ensure that potentially malicious or unstable apps reach the Store but, from a developer point of view, it can introduce some friction. It may take some time, in fact, between the first contact and seeing your app live in the Store:

  1. The engineer must test the package, which may require some time based on the complexity of the application and the current workload
  2. If everything is in order, the engineer can request the unlock of the account, which takes around 1 business day to be processed
  3. Once the developer submits the app on the Dev Center, it must be certified also by the Store team. Currently, all the Desktop Bridge apps are processed only through a manual certification process, which may take up to 5 business days

Since a couple of months the process has radically changed. The Store will now take care of performing all the steps to ensure that your Desktop Bridge application reaches the Store in a timely way if all the technical and policy criteria are satisfied. If you want to publish a Desktop Bridge app, just go to the Dev Center and submit it. From now on, you won’t see anymore an error during the package upload process saying that you don’t have the required permission. The Dev Center will analyze the package and, if it detects that your manifest declares the runFullTrust capability, it will trigger the internal process to evaluate the request.

For you, as a developer, the process will be mostly transparent. It will be exactly like submitting a normal UWP app. The app will go through the certification process and, if everything is in order, the Store will grant you the required permission and make the app generally available to the users. If, instead, the certification team will identify one or more problems, they will fail the certification and you will receive a report with the details. The only difference in the submission process is that, as soon as the Dev Center detects that the manifest of your application declares a restricted capability, it will trigger a new request in the Submission option section, as you can see from the image below:

image

Since you’re using a restricted capability, you are asked to specify the reason why your application leverage it. By clicking on Submission options, you will see the field below:

image

In case of Desktop Bridge, it’s enough to specify that your application has been packaged with the Desktop Bridge and you’re good to go. For other restricted capabilities, instead, you will have to provide a more detailed justification so that the certification team can better understand how you’re using the restricted feature.

The outcome of this new approach is that the time to market will be greatly reduced.

Happy publishing!

Viewing all 5308 articles
Browse latest View live


Latest Images

<script src="https://jsc.adskeeper.com/r/s/rssing.com.1596347.js" async> </script>